

How to Repot a Plant Without Killing It
There’s a particular kind of guilt that comes with looking at a plant you’ve loved for two years and thinking — it’s time, but what if I kill it?
You’re not wrong to feel that way. Repotting is the moment most plant parents lose a plant they’d otherwise kept alive for years. The roots get yanked. The soil falls apart. The plant goes into shock, drops half its leaves, and never quite looks the same again.
But here’s the thing nobody tells you: repotting doesn’t kill plants. Bad repotting does. The actual process, done right, is closer to giving your plant a bigger house to grow into — not surgery.
This guide walks you through exactly when to repot, how to do it without shocking the plant, and what to do in the days after — so the only thing different about your plant next week is that it finally has room to grow.
Repotting season is also the perfect time to upgrade your soil — explore our Shop Now collection of soilless potting mixes built for Indian homes and balconies.
What Does It Mean to Repot a Plant?
Repotting means moving a plant from its current container into a new one — usually larger — along with fresh soil, to give the roots more space and renewed nutrients.
It’s not the same as transplanting outdoors, and it’s not just “changing the pot.” Done correctly, repotting refreshes everything around the roots while disturbing the roots themselves as little as possible. Think of it less like moving house and more like the plant’s house growing around it.
Most indoor plants need repotting every twelve to eighteen months. Fast growers like pothos and monstera may need it yearly. Slow growers like snake plants and ZZ plants can go two to three years between repots.
Signs Your Plant Needs Repotting
Your plant tells you before you have to guess. Here’s what to look for.
Roots growing out of the drainage holes. This is the clearest sign. If you see roots poking through the bottom of the pot, the plant has run out of room underground.
Water runs straight through. When the roots take up most of the pot’s volume, there’s no soil left to absorb water. It pours in one side and drains out the bottom almost immediately.
The plant dries out unusually fast. A plant that needed water weekly now needs it every two to three days. Compacted roots mean less soil to hold moisture.
Growth has slowed or stopped despite the season being right. During spring and summer, a root-bound plant simply has nowhere to expand, so growth stalls even with good light and feeding.
The plant looks top-heavy or tips over easily. The root mass has become so dense and the pot so small that the plant is physically outgrowing its base.
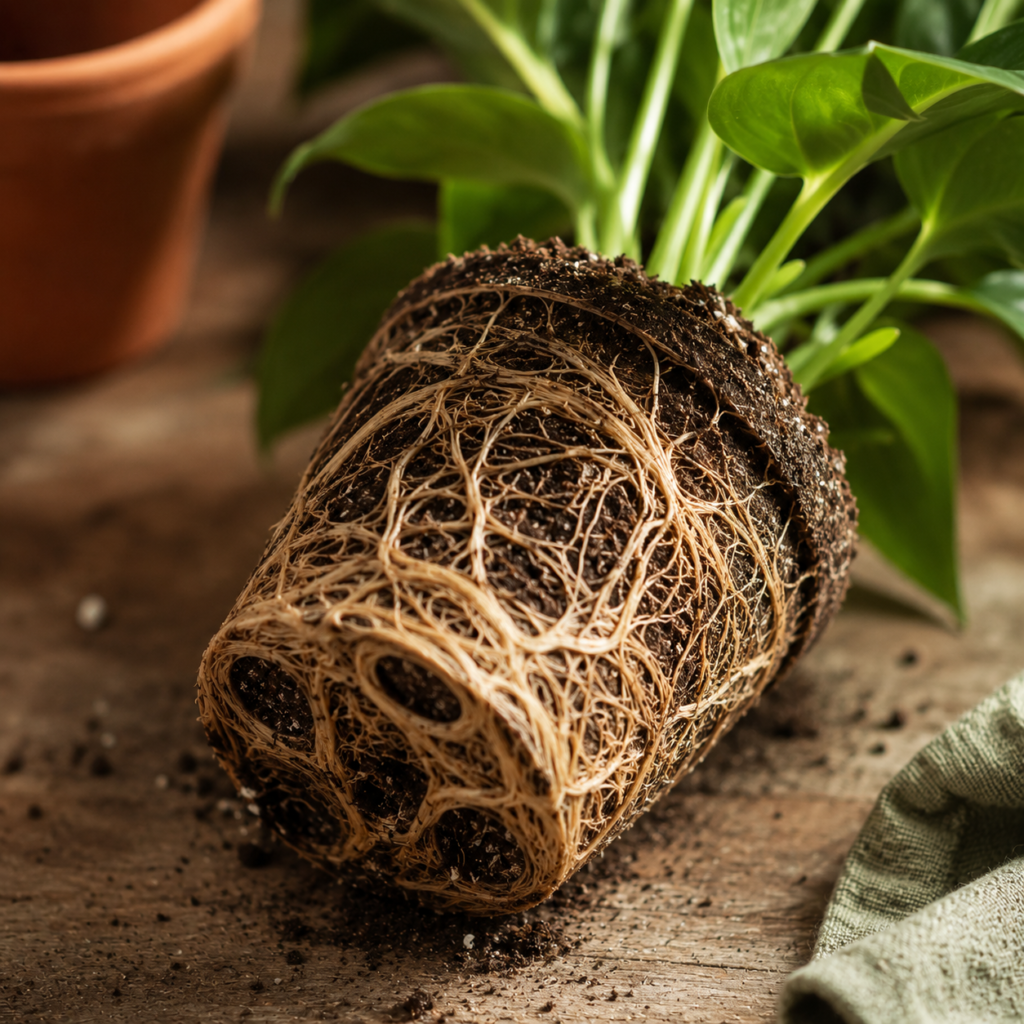
You can see roots circling the surface of the soil or pressing against a clear pot’s sides. This is a textbook sign the roots have nowhere left to go but in circles.
If you’ve already read our guide on why plant leaves turn yellow , you’ll know that yellowing despite correct watering and feeding is often due to this exact issue — a root-bound plant quietly starving in a pot too small to feed it.
When Is the Best Time to Repot a Plant?
Spring is the best time to repot most plants. This is when plants naturally enter their active growth phase, which means they recover from the stress of repotting fastest — often within one to two weeks.
In India, where the growing season runs longer than in colder climates, late February through May works well for most houseplants, before the intense summer heat sets in. Avoid repotting during the harshest summer months if possible — the combination of root disturbance and heat stress is harder on the plant.
Avoid repotting in winter unless it’s an emergency — root rot, a cracked pot, or pest infestation in the soil. A dormant plant has very little energy to recover from root disturbance, and repotting wounds can sit unhealed for months.
One exception worth knowing: if your plant is actively flowering, wait until it finishes blooming before repotting. Disturbing the roots during flowering often causes the plant to drop its flowers as a stress response.
How to Choose the Right Pot Size
This is where most people overcorrect — and overcorrecting is almost as damaging as not repotting at all.
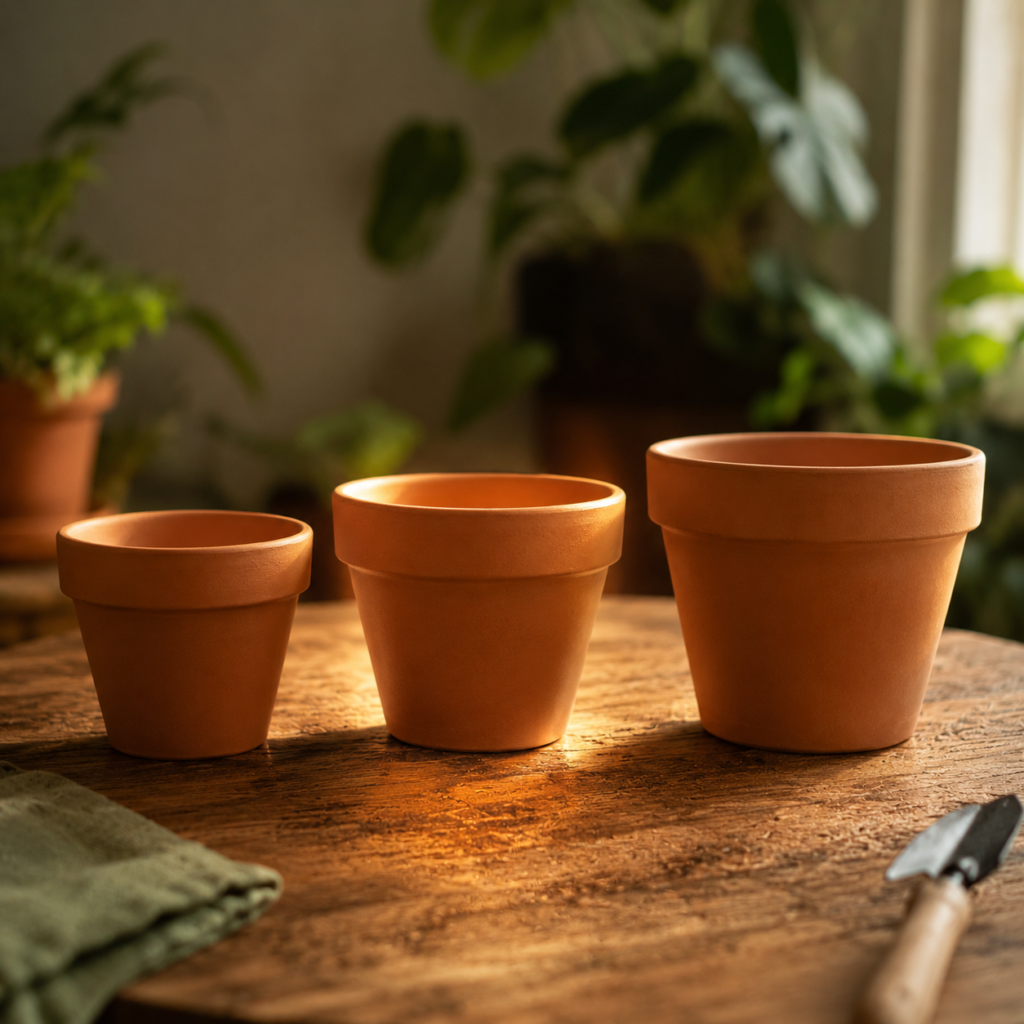
Go up by one to two inches in diameter. Never more.
It feels generous to give your plant a much bigger home — surely more room is better? But a pot that’s too large holds far more soil than the roots can draw moisture from. That excess soil stays wet for days after watering, creating exactly the waterlogged conditions that lead to root rot. If you’ve read our guide on how to fix root rot , you already know how quickly that spirals.
A good way to check: after repotting, there should be roughly one to two inches of fresh soil between the old root ball and the new pot’s edge, all the way around. Not a cavern. A modest, comfortable buffer.
Always choose a pot with drainage holes. This single feature prevents more plant deaths than almost any other factor. If you’ve fallen in love with a beautiful pot that has no hole, use it as a decorative outer cover and keep the plant in a plain nursery pot with drainage inside it.
What Soil Should You Use When Repotting?
This is the part where the quality of your repotting actually shows up — sometimes not for weeks, but it shows up.
Old, depleted soil is part of why a plant struggles even in a pot that technically still fits. Soil compacts over time, loses its structure, and becomes depleted of the nutrients and airy pockets roots need to breathe.
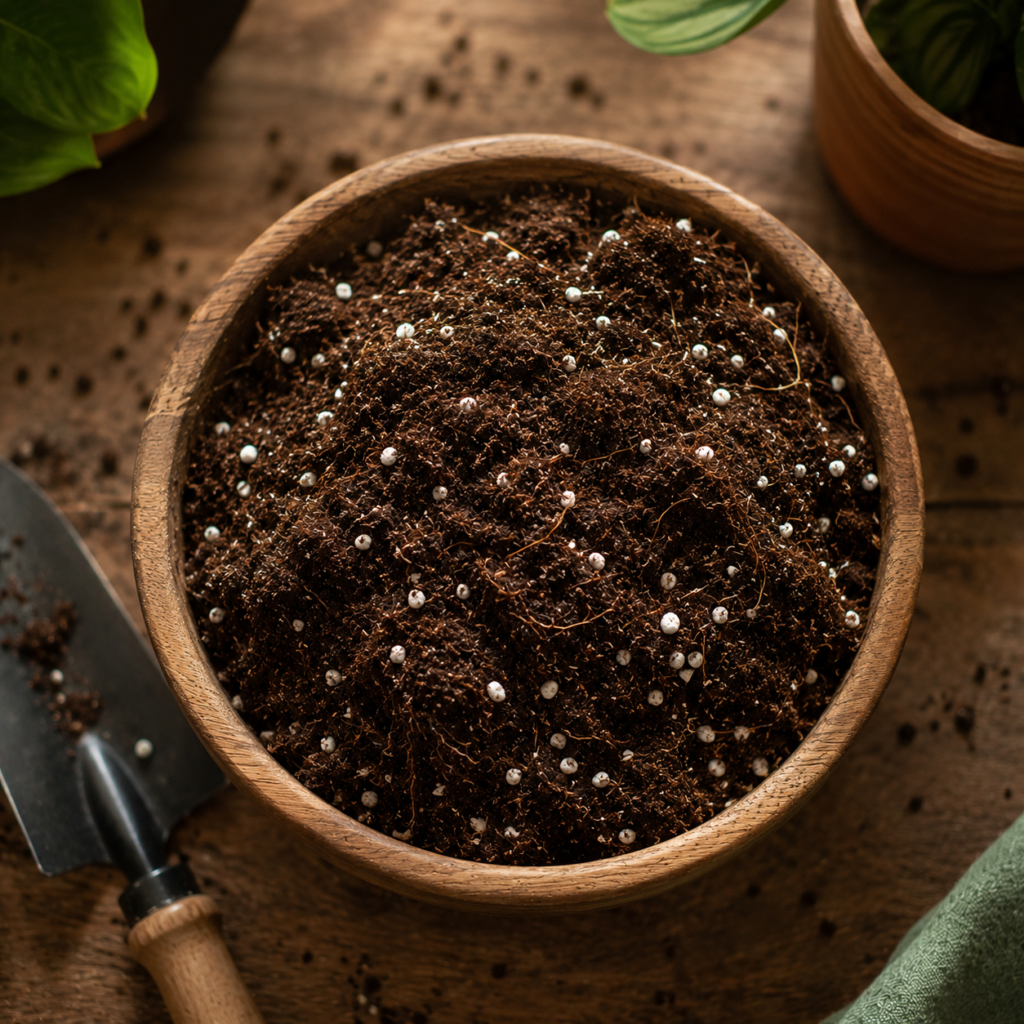
For most indoor plants, a well-draining, airy mix matters more than a nutrient-dense one — at least at first. Heavy garden soil compacts in pots and suffocates roots. What you want is a mix that holds enough moisture to sustain the plant between waterings, but lets excess water and air move freely through it.
This is exactly why soilless potting mixes have become the standard for indoor plants — they’re formulated to be light, airy, and consistent, without the unpredictability of garden soil, which can carry pests, fungal spores, or compact unevenly depending on where it was dug from.
A good soilless mix typically includes:
Coco peat or coir, which retains moisture without becoming waterlogged and has a naturally airy structure
Perlite or vermiculite, which creates pockets of air in the soil and prevents compaction
Compost or vermicompost, which provides a gentle, slow-release source of nutrients without the burn risk of chemical fertilizers
If you’ve read our guide on how to fertilize indoor plants, you’ll recognize vermicompost from there — it does double duty as both a soil conditioner and a nutrient source, which is part of why it’s so forgiving for beginners.
Our Soilless Potting Mix is built specifically around this balance — explore it in our Shop Now collection.
How to Repot a Plant — Step by Step
Here’s the part that feels intimidating until you’ve done it once. After that, it’s almost meditative.
Step 1 — Water the plant a day before repotting.
Slightly moist soil holds together better and slides out of the pot more easily than bone-dry soil, which crumbles and stresses the roots more during removal.
Step 2 — Prepare the new pot first.
Add a small layer of fresh soil mix at the bottom of the new pot — just enough that when you place the root ball on top, the plant sits at the same depth it was at before. Planting too deep can cause stem rot; too shallow leaves roots exposed.
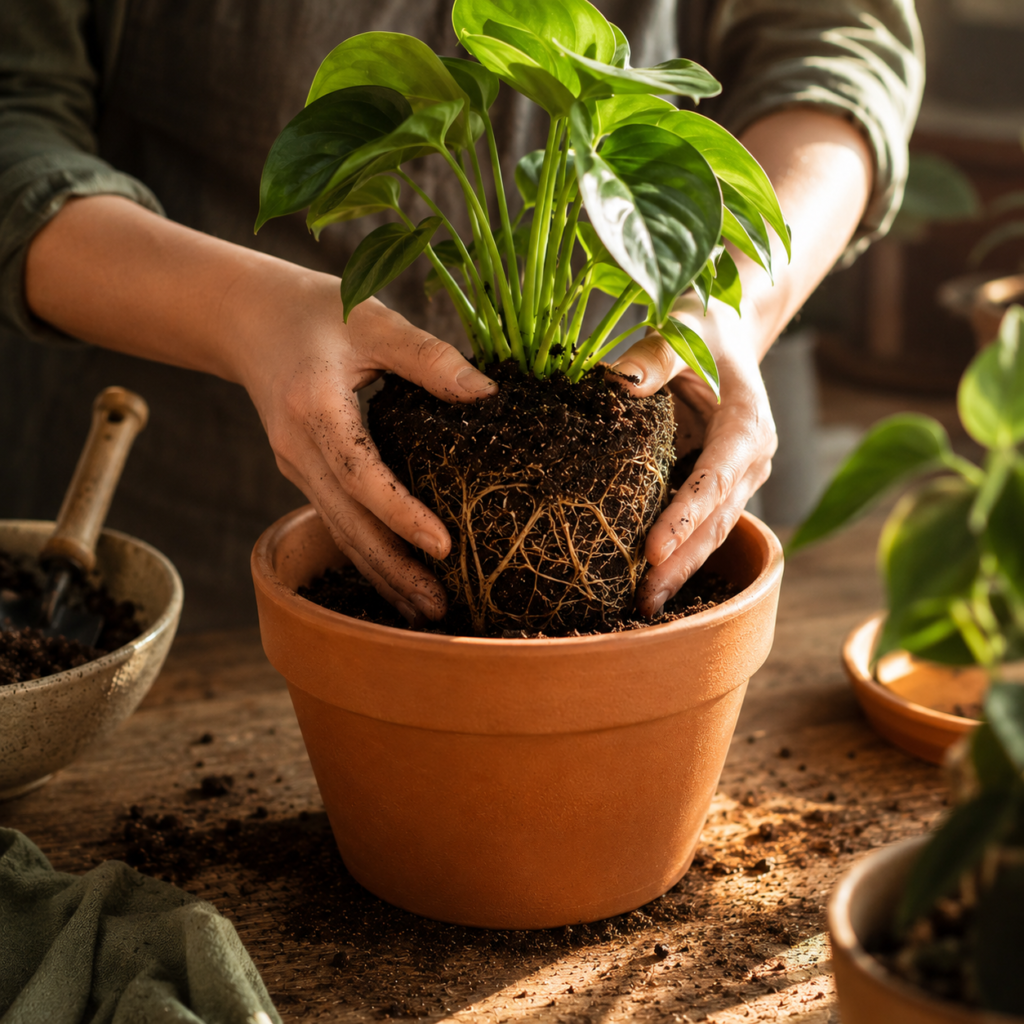
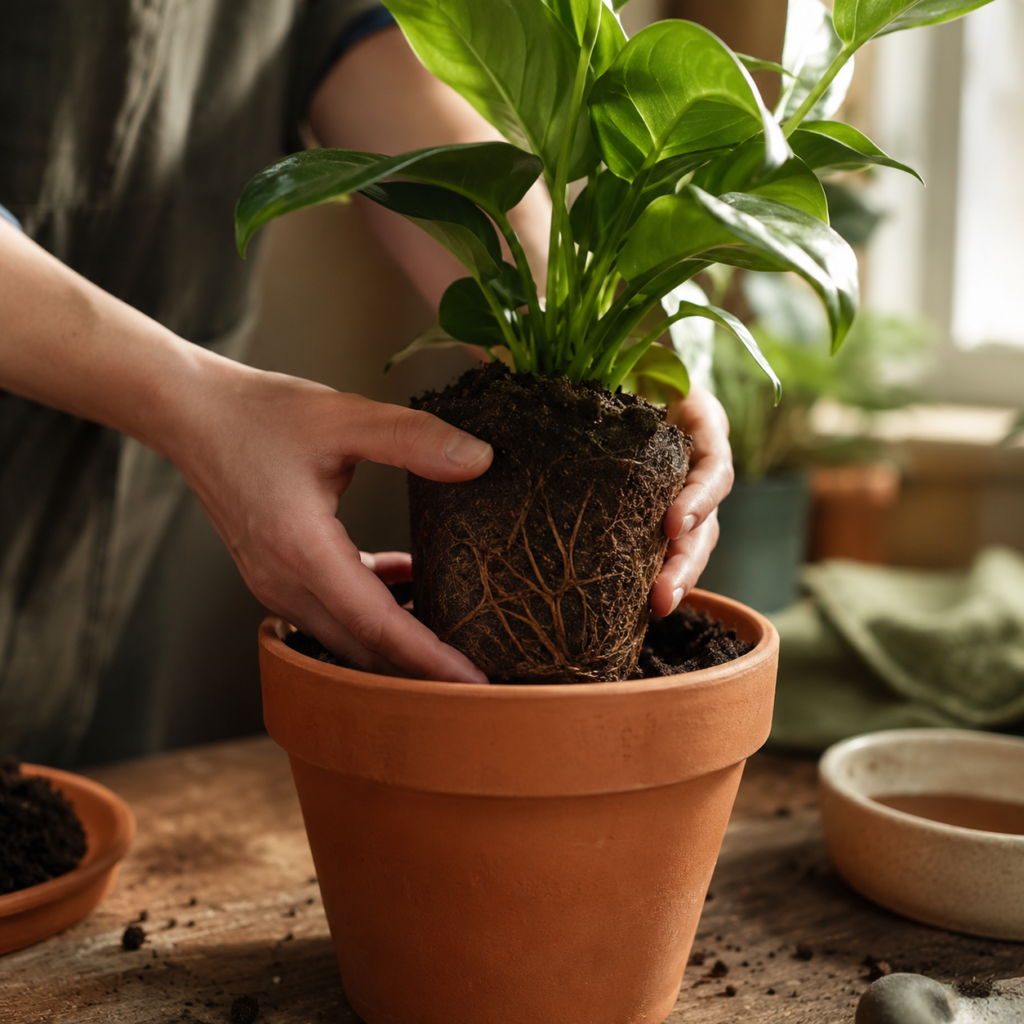
Step 3 — Remove the plant gently.
Tip the pot on its side and ease the plant out by holding the base of the stem, not pulling on the leaves. If it’s stuck, run a clean knife or thin spatula around the inside edge of the pot to loosen it.
Step 4 — Look at the roots before doing anything else.
This is your moment of truth. Healthy roots are firm and pale — white, tan, or light brown. If you see dark, mushy, or foul-smelling roots, you’re not just repotting — you’re also dealing with root rot, and that needs addressing first.
Step 5 — Gently loosen circling roots.
If roots have been circling the pot, use your fingers to tease them outward gently. For severely root-bound plants, you can make a few shallow vertical cuts into the root ball with a clean knife — this encourages roots to grow outward into the new soil instead of continuing to circle.
Step 6 — Place the plant in the new pot.
Center it on the soil layer you prepared, at the same depth as before. Hold it steady with one hand while you work.
Step 7 — Fill in around the roots with fresh soil.
Add soil gradually, pressing gently as you go to eliminate large air pockets — but don’t compact it hard. The goal is snug, not packed.
Step 8 — Water lightly, then let it rest.
Give the plant a light watering to help the new soil settle around the roots. Then place it somewhere with bright, indirect light — not direct sun — for the next week or two.
What to Do After Repotting — The First Two Weeks
This is the part most guides skip, and it’s often where plants are lost — not during repotting, but in the days after.
Don’t fertilize for at least four to six weeks. Fresh soil mix usually contains enough nutrients to sustain the plant during this period. A freshly repotted plant has disturbed roots, and adding fertilizer now risks burning them before they’ve had a chance to settle.
Expect some drooping — and don’t panic. It’s normal for a plant to look slightly sad for three to seven days after repotting. This is called transplant shock, and in most cases it resolves on its own as the roots settle into the new soil.
Keep it out of direct sun and away from drafts. Bright, indirect light is ideal. Direct sun adds heat stress on top of root stress — too much for a recovering plant to handle well.
Water based on the new soil’s moisture, not your old schedule. Fresh soil mix often retains moisture differently than the old, compacted soil did. Check the top inch with your finger before watering, rather than watering on autopilot.
If leaves drop, that’s often normal — but watch the pattern. A few yellow or droopy leaves in the first week, especially older ones, are a normal stress response. If new growth stalls for more than three to four weeks, or if you see soft, mushy stems, that’s worth investigating further.
Quick Reference — Repotting Cheat Sheet
When to repot — every 12 to 18 months for most plants, yearly for fast growers like pothos and monstera
Best season — spring, before peak summer heat
Pot size increase — one to two inches in diameter, never more
Pot requirement — drainage holes, always
Soil type — light, airy, well-draining soilless mix
Before repotting — water the plant the day before
After repotting — no fertilizer for four to six weeks, bright indirect light, water based on moisture not schedule
Signs of healthy roots — firm, pale, white to light brown
Signs of a problem — dark, mushy, foul-smelling roots — address root rot first
The Bottom Line
Repotting feels like the riskiest thing you can do to a plant you’ve kept alive for years — but it’s usually the opposite. A plant that’s outgrown its pot is already struggling quietly, long before it shows. The repotting itself, done gently and at the right time of year, is the easy part.
The real care happens in the two weeks after — patience, indirect light, and resisting the urge to fertilize too soon. Do that, and most plants don’t just recover. They take off.
Frequently Asked Questions
How do I know if my plant is root bound?
The clearest sign is roots growing out of the drainage holes at the bottom of the pot. Other signs include water draining straight through without being absorbed, the plant drying out much faster than usual, and roots visible circling the surface of the soil or pressing against the sides of a clear pot. If you see several of these together, the plant is root bound and ready for repotting.
Is it normal for a plant to droop after repotting?
Yes. Mild drooping or a few yellow leaves in the first three to seven days after repotting is a normal stress response called transplant shock. The plant is adjusting to disturbed roots and new soil. It typically resolves on its own within one to two weeks as the roots settle. If drooping continues beyond three to four weeks, or if you notice soft mushy stems, check for root rot or repotting damage.
Can I repot a plant that is flowering?
It’s best to wait until the plant finishes blooming. Repotting disturbs the roots, and many flowering plants respond to that disturbance by dropping their flowers as a way of conserving energy. If repotting can’t wait — for example, if the plant is severely root bound and declining — proceed carefully, but expect to lose the current bloom.
Do I need to repot every plant every year?
No. Repotting frequency depends on how fast the plant grows. Fast-growing plants like pothos, monstera, and philodendrons often need repotting yearly. Slow-growing plants like snake plants, ZZ plants, and many succulents can comfortably stay in the same pot for two to three years. Check for the signs of being root bound rather than repotting on a fixed schedule.
What’s the difference between repotting and just refreshing the topsoil?
Repotting moves the entire plant, including its root ball, into a new pot with fresh soil around it — used when the plant has outgrown its container or the soil has become severely depleted. Refreshing the topsoil means removing the top one to two inches of old soil and replacing it with fresh mix, without disturbing the roots or changing pots — a much gentler option for plants that don’t need a size increase but could use a nutrient boost. If your plant fits its pot well but seems to be slowing down, topsoil refresh with vermicompost is often enough.
Can I use garden soil for repotting indoor plants?
It’s not recommended. Garden soil compacts significantly in containers, which restricts airflow to the roots and increases the risk of waterlogging and root rot. It can also carry pests, weed seeds, or fungal spores that thrive indoors without natural predators to keep them in check. A well-draining soilless potting mix designed for containers gives roots the airy, consistent environment they need — something garden soil generally can’t replicate in a pot.
How long does it take for a plant to recover from repotting?
Most healthy plants show visible recovery within one to two weeks — new leaves, perkier existing foliage, and a return to normal growth. Full establishment in the new soil, where the roots have grown out to fill the new space, typically takes four to six weeks. This is also roughly when it becomes safe to start fertilizing again.
One Response